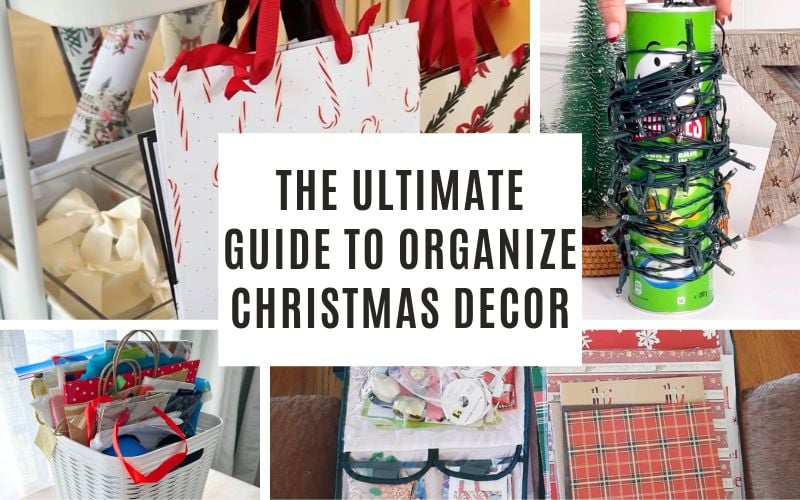
Ultimate Guide To Organize Christmas Decorations
The holidays are magical, but once the season is over, the not-so-fun task of packing everything away begins. From tangled lights to crushed ornaments, storing Christmas decorations can quickly become overwhelming if you don’t have a system in place.
The good news? With a little planning and the right strategies, you can keep everything neat, protected, and ready to go for next year.
In this ultimate guide to organizing Christmas decorations, we’ll cover smart and practical solutions for storing Christmas lights, artificial trees, gift bags, and ornaments—so you can spend less time untangling and more time enjoying the season when it comes around again.
This post contains affiliate links. As an Amazon Associate we earn from qualifying purchases.
How to Organize Christmas Lights
Christmas lights are beautiful when they’re twinkling on the tree or strung around the house, but once the holidays are over, they can quickly become a tangled mess in storage. The good news is, you don’t need fancy organizers to keep them neat.
With a bit of creativity, you can use items you already have at home to store your lights for free. Here are a few clever (and budget-friendly) ideas:
Genius Christmas Light Organization Ideas (Totally Free)
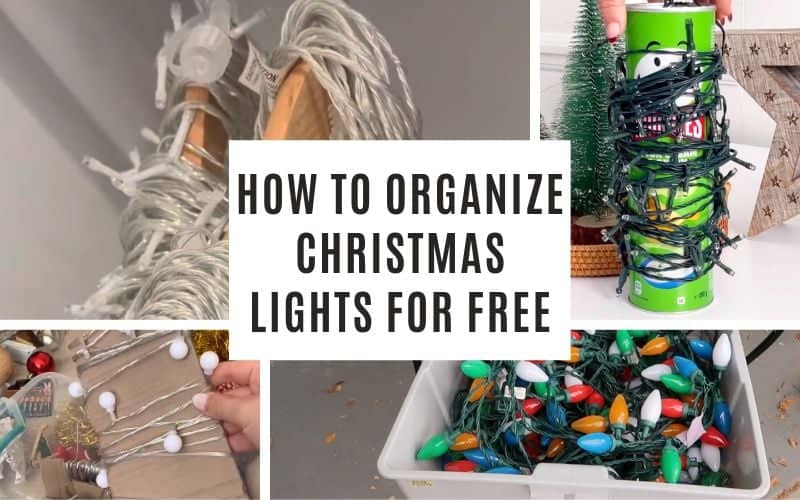
1. Wrap Them Around a Pringles Can

PHOTO CREDIT @thisgirlcanorganise
Instead of tossing that empty Pringles can in the recycling bin, repurpose it as a Christmas light organizer. Start by tucking the plug end into the can’s opening, then wrap the lights around the outside.
The sturdy shape keeps the cord from tangling, and you can even drop small ornament hooks or extra bulbs inside the can for safekeeping.
2. Use an Empty Paper Towel Roll

PHOTO CREDIT @stephaniealoe
A cardboard paper towel tube makes a surprisingly effective light spool.
Cut a small slit on one end of the tube, slide the plug into the slit to anchor it, and begin winding the strand around the roll. When you’re done, tuck the other end into the tube as well. It’s lightweight, compact, and perfect for smaller light strings.

PHOTO CREDIT @dailyoriginalvids
3. Wrap Around a Piece of Cardboard

PHOTO CREDIT @dash_of_dani_
This method works especially well if you have longer strands of lights. Grab a piece of sturdy cardboard (a leftover shipping box works perfectly) and cut it into a rectangle. Anchor one end of the lights with a small slit on the edge of the cardboard, then wrap the strand neatly around until you reach the other side.
Not only does this keep your lights organized, but you can also stack multiple cardboard “light boards” together in a single bin for easy storage.

PHOTO CREDIT @dash_of_dani_
4. Store Them in a Plastic Bin

Once you’ve wrapped your lights around a can, tube, or piece of cardboard, place them inside a plastic storage bin.
This protects them from dust and moisture while keeping everything in one place. Clear bins work best because you can quickly see what’s inside when it’s time to decorate again.
5. String Them Around a Hanger

PHOTO CREDIT @jules_interiors
A regular clothes hanger can double as a light holder. Start by securing the plug end on the hook of the hanger, then wind the lights around the hanger’s body.
This method works especially well if you hang the wrapped lights in a closet or on a storage rack—keeping them both untangled and off the floor.
By reusing simple household items, you’ll save money and avoid the frustration of untangling lights next year. It’s a win-win—less waste, more organization, and stress-free decorating when the holidays roll back around.
The Best Way to Store Ornaments
How to Organize Christmas Ornaments
When the holiday season ends, packing up your decorations can feel overwhelming—especially when it comes to ornaments. Without a good system, delicate pieces can break, boxes can get cluttered, and next year you’ll find yourself digging through a tangled mess.
The good news is, with a little planning, you can organize and store your ornaments so they stay safe, sorted, and easy to unpack next Christmas.
Here’s your step-by-step guide to doing it right.
Before You Start
A little prep work goes a long way in keeping your ornaments in good condition:
-
Sort ornaments: Group them by size, type, or theme (for example, all glass ornaments together, all rustic ornaments together).
-
Clean and inspect: Gently dust ornaments and check for any damage. Repair or discard broken pieces so you don’t store them away for another year.
-
Remove batteries: If you have ornaments or decor with batteries, take them out to prevent leakage and corrosion.

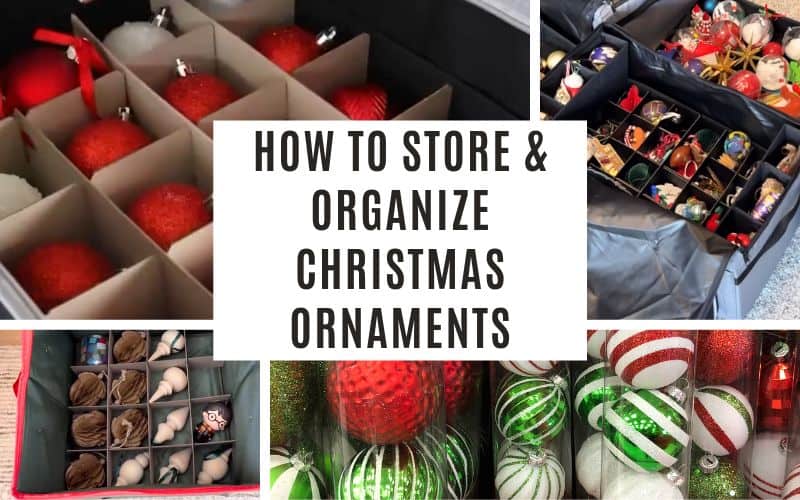
Storage Containers and Materials
You don’t always need fancy organizers—though they can help. Here are some tried-and-true storage methods:
-
Divided storage bins: These bins have compartments that keep ornaments separate and secure. Perfect for fragile or oddly shaped pieces.
-
Original ornament boxes: If the packaging is sturdy, keep ornaments in their original boxes for the best fit and protection.
-
Egg cartons and plastic cups: Great for small, delicate ornaments. Place each ornament in its own section for safe storage.
-
Wrapping materials: Use tissue paper, bubble wrap, or even soft fabric to wrap fragile ornaments and prevent scratches or chips.
-
Ziploc bags: Store shatterproof ornaments in labeled bags to save space and keep them together.

Photo Credit: @themertenshome
Organizing Tips
Once you have the right materials, organizing is all about creating a system that works for you:
-
Use adjustable dividers: Look for bins with dividers that can be adjusted to fit ornaments of different sizes.
-
Create themed or color-coded bins: Store ornaments by color, theme, or style (like rustic, metallic, or kid-friendly) to make decorating easier next year.
-
Label clearly: Use a marker or label maker to write what’s inside each container to avoid opening multiple boxes.
-
Consider a storage map: If you have a large collection, jot down an inventory or even a quick storage “map” so you’ll know exactly where everything is stored.

Photo Credit: @destination_home
Use a box that has a layering system. Each ornament goes into a compartment, then you lay down another layer of cardboard and start again.

Photo Credit: @lizfenwickdiy
Use a box you already have and cut pieces of cardboard to keep each section separated.

If your glass ornaments come in a sturdy box, consider keeping it and see if it can fit into a larger bin for storage.
Be sure to mark the box with a label detailing what’s in there.

If you have the room, it can be cheaper and easier to keep the original packaging.
This can be the safest way to store the ornaments. The drawback is that it can take up a lot of space if you only have room for a specific-shaped container.


How to Store Christmas Gift Bags
How to Store Christmas Gift Bags
Gift bags are one of those holiday essentials we all seem to collect over the years. They’re too nice to throw away, but if you’re not careful, they can end up crumpled, torn, or scattered throughout your storage space.
The good news is that with a little organization, you can keep your Christmas gift bags neat, accessible, and ready to reuse for seasons to come. Here’s how to do it, plus photo examples!
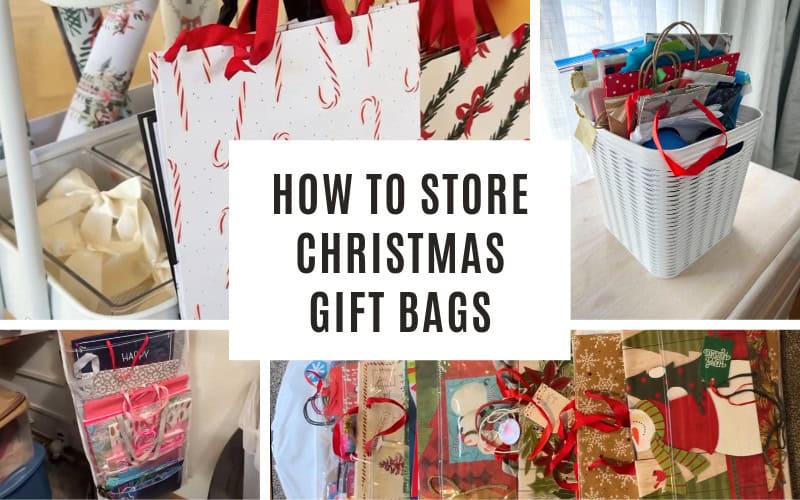
Step 1: Gather and Sort
Start by gathering all your gift bags in one place. Sort them by:
-
Size – small, medium, large, and oversized bags.
-
Theme – Christmas-specific vs. general-purpose bags (which you can use year-round).
-
Condition – keep only the bags that are in good shape. Recycle or repurpose any that are torn or heavily wrinkled.

PHOTO CREDIT: @smartmove_organizing
Step 2: Flatten for Easy Storage
Gift bags store best when they’re completely flat. Remove tissue paper, fold in the sides, and press them down.
This not only saves space but also prevents wrinkling and bending.

Step 3: Choose a Storage Method
There are several ways to keep your gift bags organized, depending on how much space you have:
-
Magazine Holders or File Organizers: Perfect for small and medium-sized bags. Stand them upright and sort by size so you can quickly flip through and grab what you need.
-
Under-the-Bed Storage Bins: A shallow bin works great for keeping large or oversized bags flat and out of the way.

Photo Credit: @bannerbabe_88
-
Hanging Closet Organizer: Use a vertical hanging organizer with compartments to separate bags by size or style.
-
Clear Plastic Bins: Stack bags by size in a transparent bin so you can see your collection at a glance.
-
Gift Wrap Station: If you already have a bin or cart for wrapping paper and ribbons, dedicate a section for gift bags to keep everything together.
Gift Wrapping Station:

Photo Credit: @teresalaucar
- Stand Up In Box: Stand all of your bags upright in a plastic bin or a cardboard box.
Hanging Gift Bags:
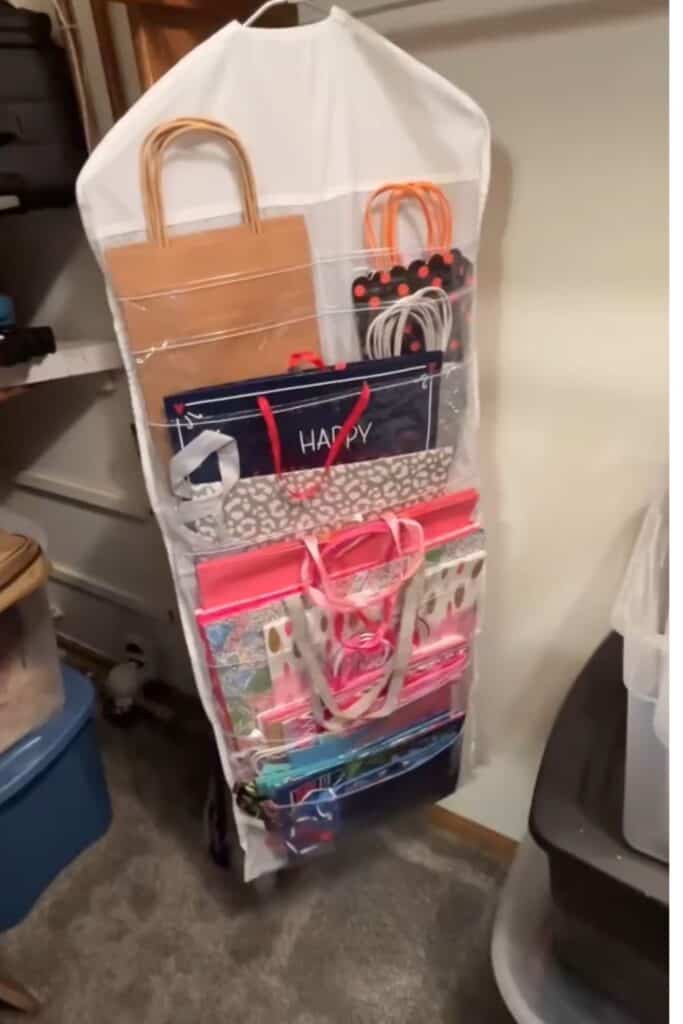
PHOTO CREDIT: @smartmove_organizing
A few years ago, I actually sewed some of my own gift bags out of Christmas-themed cotton fabric in different sizes.
It was a fun little project, and those bags have held up beautifully year after year. Between those handmade bags and the collection we’ve saved from past holidays, I’ve rarely had to buy new ones.
It’s been such a money-saver, and I love the tradition of reusing them each Christmas—it feels both practical and a little bit special.
Step 4: Keep Accessories Together
Don’t forget the extras! Store tissue paper, tags, ribbons, and bows in a small pouch or container alongside your bags. That way, when you grab a bag, everything you need to wrap a gift is right there.
In our family, reusing gift bags has even become part of the holiday tradition. Every year, we pull out the same collection of bags we’ve saved, and without fail, someone ends up with the oldest, most well-traveled one.
It’s become a running joke that we’re still using it after all these years, and it always gets a good laugh. What started as a way to save money and reduce waste has turned into a little family memory we look forward to each season.

Photo Credit: @everything.envy
Step 5: Label and Store
If you’re using bins or boxes, label them clearly (e.g., “Christmas Gift Bags” or “All Occasion Bags”). Store them in a closet, under the bed, or with the rest of your holiday decor so you’ll know exactly where to find them when it’s time to wrap gifts.
The Best Ways to Store a Christmas Tree
The Best Ways to Store a Christmas Tree
Artificial Christmas trees are a wonderful investment—they’re reusable, convenient, and often look just as beautiful year after year. But the key to keeping your tree looking fresh and lasting for many seasons is how you store it once the holidays are over.
A poorly stored tree can lose its shape, collect dust, or even get damaged in the off-season. The good news is, with the right storage method, you can protect your tree and make next year’s setup a breeze.
Step 1: Prep Your Tree for Storage
Before you pack away your tree, take a few minutes to prepare it properly:
-
Remove decorations: Make sure all ornaments, garland, and lights are taken off before storing.
-
Dust and clean: Wipe down branches with a soft cloth or use a handheld vacuum with a brush attachment to remove dust and glitter.
-
Disassemble carefully: Most artificial trees come apart in sections. Gently remove each piece and fluff them down to a compact shape without bending or breaking the branches.
-
Check for damage: Look for any broken branches or loose hinges and repair them if possible before storing.
Step 2: Choose the Right Storage Option
How you store your tree depends on your available space and how much protection you want. Here are some of the best methods:
1. The Original Box
Many people simply slide their tree back into its original cardboard box. While this works, the box can weaken over time and doesn’t protect well from moisture or pests.
If you use this method, reinforce the box with packing tape and store it in a dry area.
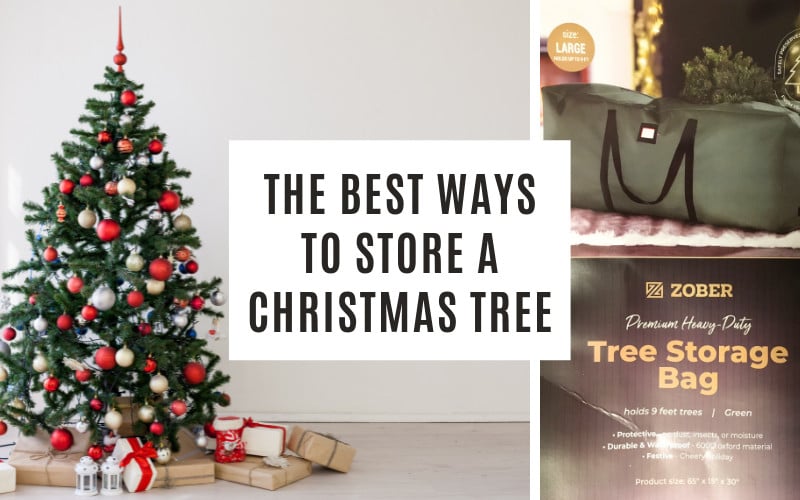
2. A Tree Storage Bag
One of the most popular options is a zippered storage bag specifically made for artificial trees. These bags are durable, easy to carry, and protect your tree from dust and dirt. Look for one with handles or wheels for easier transport.

This is the exact tree storage bag that we use every year.

3. A Hard Storage Container
For maximum protection, consider a hard plastic storage bin designed for artificial trees. These bins keep your tree safe from moisture, pests, and accidental damage. They’re ideal if you store your tree in a garage, attic, or basement where conditions may fluctuate.
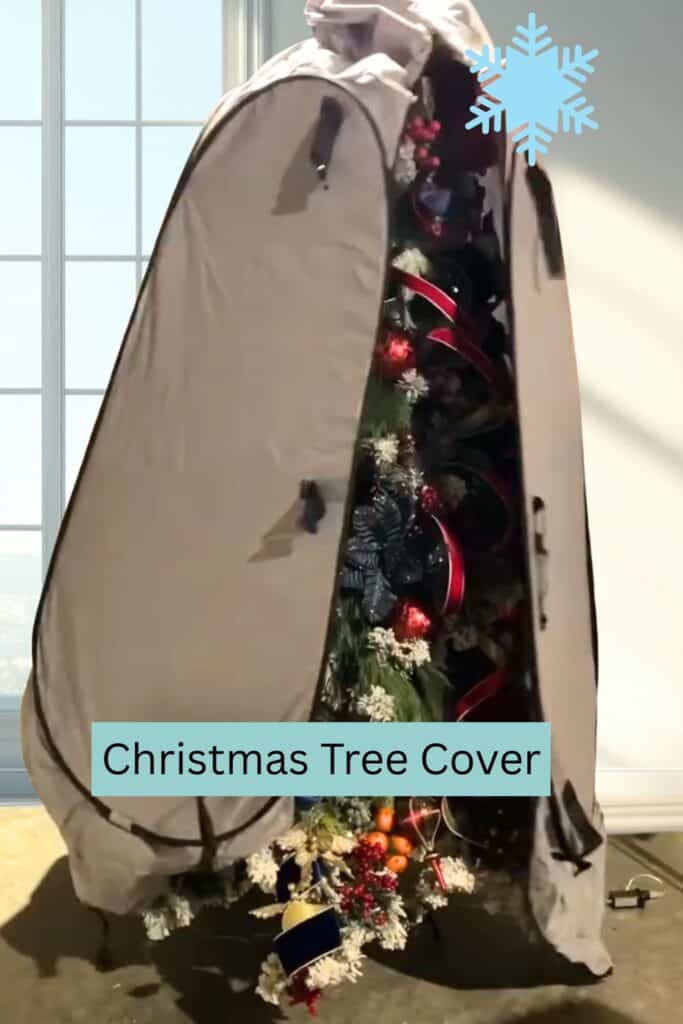
4. Upright Storage
If you want to save time, upright storage bags let you wrap and store the tree fully assembled.
Simply slip the bag over the tree, cinch it at the bottom, and wheel it into storage. Next year, all you’ll need to do is unzip and fluff.
A Personal Note on Tree Storage
For years, I always stored our artificial Christmas tree in the box it originally came in. It felt like the simplest and most practical solution—and best of all, it was free.
But as the years went by, the cardboard started to break down, and I noticed dust and debris collecting inside. Eventually, I decided it was time for an upgrade and purchased a large tree storage bag. That turned out to be such a great decision.
Not only does the bag protect the tree much better, but it also has extra room, which means I can store our tree lights inside as well. It’s made packing up after Christmas so much easier, and I know everything is safe and ready for next season.
Step 3: Find the Best Storage Location
Where you store your tree is just as important as how you pack it:
-
Cool and dry spaces: Avoid damp basements or hot attics. A closet, spare room, or climate-controlled storage area is best.
-
Avoid heavy stacking: Don’t pile heavy boxes on top of your tree container, as this can bend branches or crush the structure.
-
Keep it accessible: Store the tree in a spot where it’s easy to pull out next season, instead of tucking it behind everything else.
Step 4: Label Clearly
If your storage container isn’t see-through, add a clear label that says Christmas Tree (or even include details like “7-foot tree, pre-lit”). This will save you time searching when the next holiday season rolls around.
🎄 Make Your Holidays Stress-Free 🎄
If you’re feeling overwhelmed by all the moving pieces of the holiday season, I’ve created a free Christmas planner to help you stay organized. Inside you’ll find pages for gifts, meals, events, and more—everything you need to simplify your December and actually enjoy it. You can grab your free planner here and start planning a calmer, more joyful Christmas today!
Final Thoughts
Organizing your Christmas decorations doesn’t have to be stressful or complicated. With a few simple storage solutions, you can protect your holiday treasures, save space, and make decorating next year so much easier.
Whether it’s neatly wrapping your lights, keeping your ornaments safe, or finding a smart way to store your tree and gift bags, a little effort now will save you hours of frustration later. With everything in order, you’ll be ready to bring the holiday magic back into your home—without the chaos—year after year.
Pin The Ultimate Guide To Organize Christmas Decor